Tile grout is a key player in the world of tiling, often underestimated in its importance. It’s not just a substance to fill the voids between tiles; it plays a significant role in the overall integrity and appearance of your tile work. Grout acts as a bonding agent, locking tiles in place and preventing the edges from chipping and cracking.
It also serves as a barrier against moisture and debris, which can undermine the tile adhesive and the substrate beneath. Understanding grout’s composition and function helps in appreciating its role in both the aesthetics and longevity of tiled surfaces.
Types of Tile Grout
Unsanded Grout
This type of grout is typically made without sand, resulting in a smoother, finer consistency. It’s particularly suitable for wall tiles or floor tiles with narrow joints (typically less than 3.2 mm wide). Unsanded grout is less abrasive, making it a preferred choice for delicate tiles like mosaic tiles or polished stone that might easily scratch. Its smoother finish provides a clean and sharp look, ideal for the intricate tile patterns associated with decorative tiles.
Sanded Grout
As the name suggests, sanded grout contains fine sand particles, adding bulk and strength. This makes it ideal for floor tiles or any tile application with wider joints (usually 3.2 mm to 12.7 mm), such as outdoor tiles. The sand prevents the grout from shrinking and cracking in larger joints, ensuring durability. Sanded grout is typically harder to work with than unsanded grout due to its rougher texture and is more visible within the tile layout, influencing the overall aesthetic.
Epoxy Grout
Epoxy grout stands out for its robustness and resistance to staining and chemical damage. Composed of epoxy resins and a filler powder, this type of grout is highly resistant to moisture and bacteria, making it an excellent choice for areas prone to high humidity, like bathrooms and kitchens.
Although more challenging to apply and typically more expensive than cement-based grouts, its longevity and low maintenance needs make it a worthwhile investment for demanding environments.
Specialty Grouts
This category encompasses a range of grouts designed for specific needs and environments. It includes grouts with anti-mould properties, perfect for damp areas; colourant grouts that offer vibrant or unique hues for design flexibility; and sealant grouts that provide an added layer of protection for the tile work. Each type offers unique benefits and is formulated to address particular challenges in tile installation and maintenance.
Choosing the Right Grout for Your Project
Selecting the appropriate grout goes beyond just choosing a grout colour. It involves considering the tile material, the location of the installation (indoors or outdoors), the width of the joints, exposure to moisture, and the overall desired aesthetic. For example, a high-moisture area like a shower would benefit from epoxy or mould-resistant grout, while a decorative backsplash might call for a colourant grout to complement or contrast the tile colour.
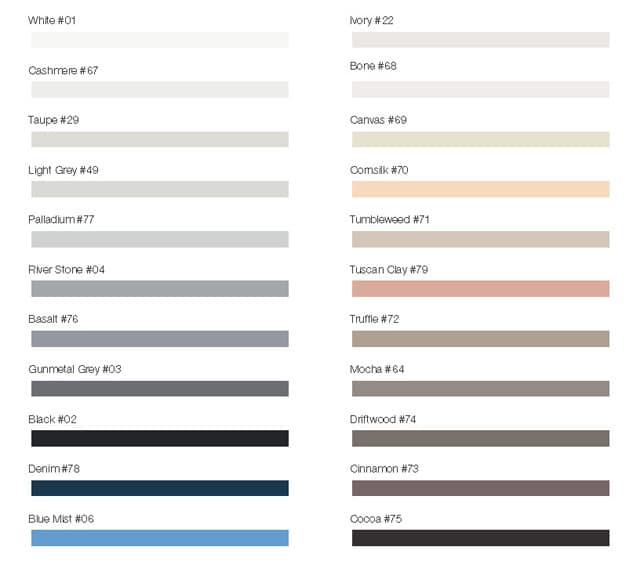
In terms of colour, a contrasting grout colour can highlight the tile pattern and shape, making a bold design statement. For example, if you want to use white tiles, using a black-coloured grout is ideal to get that contrasting effect. This choice is ideal for feature walls, or any areas where you want to make a statement. On the other hand, a complementary grout colour creates a more subtle, cohesive look, allowing the tiles themselves to take centre stage.
Alternatively, if you’re in the process of tiling a bathroom or a laundry, it’s ideal to pick a neutral colour, such as grey, so that stains and spills can be seen more easily. The choice of grout can profoundly affect the tile installation’s final appearance and longevity, making it a crucial decision in any tiling project.

Grout Application Techniques
Preparation
The success of grout application largely depends on the preparation of the tile surface. Before starting, ensure that the tiles are firmly set and the adhesive has fully cured. Clean the surface thoroughly to remove any dust, debris, or adhesive residue. The tiles and the spaces between them should be completely dry.
Moisture can adversely affect the grout’s adhesion and curing process. Also, check the joint depths to ensure they are uniform and ready to accept the grout.
Mixing Grout
Achieving the right consistency is crucial for effective grout application. Follow the manufacturer’s instructions for mixing ratios. Generally, add water to the grout powder gradually until you achieve a consistency similar to toothpaste. It should be moist and hold together, but not so wet that it becomes runny or too dry that it crumbles.
| Tile Size (mm) |
Ideal Trowel Size (mm |
| 100 x 100 |
6 x 6 |
| 200 x 200 |
8 x 8 |
| 300 x 300 |
10 x 10 |
| 400 x 400 |
12 x 12 |
| 600 x 600 |
15 x 15 |
Let the mixture sit for a few minutes (as directed) to allow the water to fully penetrate the powder, a process known as ‘slaking’. After slaking, give the grout one final mix before application.
Applying Grout
Using a grout trowel, a tool designed for grout application, hold it at a 60-degree angle to the tile surface. The size of the tiles that you’re working with will determine the size of the trowel you should be using; use a small trowel with larger tiles and you may not apply enough grout to the tiles. Alternatively, if you use a large trowel to apply grout to smaller tiles, you may find yourself applying too much grout. Apply the grout to the tile, pressing firmly to work it into the joints.
Ensure the grout is packed into each joint completely to avoid air pockets, which can lead to cracking and crumbling over time. Work in small sections to maintain control over the application and to ensure that the grout doesn’t begin to set before being properly placed into the joints.
Cleaning & Finishing
After applying the grout, wait for a brief period (as specified by the grout manufacturer) for the grout to begin setting. Using a damp (not wet) sponge, gently wipe across the tiles in a diagonal motion to remove excess grout from the tile surface without disturbing the grout within the joints.
Regularly rinse the sponge in clean water to avoid re-depositing grout on the tile surface. Once the grout has dried to a haze, use a soft, dry cloth to buff off the remaining residue. Finally, shape and smooth the grout lines with a grout finishing tool or a damp sponge for a professional look.
Curing & Setting Time
Each type of grout has a specific curing time, which can range from a few hours to several days. It’s essential to refer to the manufacturer’s instructions for the exact time frames.
During the curing period, keep the grouted area dry and undisturbed. Avoid any foot traffic on floor tiles and any contact with wall tiles. This allows the grout to harden and set properly, ensuring a strong and durable finish.
Environmental conditions like humidity and temperature can affect the curing time. High humidity and lower temperatures typically slow down the curing process, while low humidity and higher temperatures can speed it up. Adjust your expectations accordingly and give extra time in adverse conditions.
Maintenance & Cleaning of Tile Grout
Routine Cleaning
Regular cleaning is vital to maintain the appearance and integrity of tile grout. Sweep or vacuum tiled areas frequently to remove dirt and debris that can scratch or dull the grout surface. For floor tiles, a gentle mopping with warm water can help keep the grout clean. Make sure to change the mop water when it gets dirty to avoid re-depositing grime onto the grout lines.
Deep Cleaning
Over time, your grout may become stained or discoloured, necessitating a deeper cleaning. For these instances, a pH-neutral cleaner specifically designed for tiles and grout is recommended. You can also create a homemade cleaning solution by mixing baking soda with water to form a paste. Apply this paste onto the grout lines, leave it for a few minutes, and then gently scrub with a soft brush or toothbrush. Rinse the area thoroughly with clean water to remove any residue.
Using Cleaning Agents
When choosing cleaning products, opt for those that are safe for grout to avoid causing any damage. Harsh chemicals like bleach or ammonia can erode grout over time, leading to weakening and potential damage. Always follow the instructions on cleaning products and test them on a small, inconspicuous area first.
Want to learn more? Check out our blog post on “How to Clean Tiles“ for expert tips and step-by-step guidance on tile maintenance.
Preventing and Treating Mould and Mildew
Moisture and dampness are the primary culprits behind mould and mildew growth in your grout. To prevent this, ensure good air circulation in moisture-prone areas like bathrooms and kitchens. Use exhaust fans, open any windows in the room, and consider using a dehumidifier in highly humid conditions.
Regular cleaning is crucial in preventing mould growth. For existing mould, use a mildewcide or a solution of vinegar and water to clean the affected areas. It’s important to address mould issues promptly to prevent it from spreading.
Grout Sealing & Protection
Sealing grout is an effective way to extend its life and maintain its appearance. Grout sealers come in two main types: penetrating and non-penetrating (surface) sealers. Penetrating sealers absorb into the grout, providing protection from within, while non-penetrating sealers form a protective barrier on the surface.
Sealing is especially recommended for areas exposed to high moisture levels, such as showers and backsplashes. Reapply the sealer periodically, as recommended by the product’s manufacturer, to maintain its protective properties.
Repairing & Replacing Grout
Keep an eye out for any signs of grout damage, such as cracking, crumbling, or discolouration. These issues can lead to more significant problems like water infiltration and tile damage.
For minor cracks, a simple reapplication of grout might suffice. For more severe damage, it may be necessary to remove the old grout and reapply new grout. This process involves carefully scraping out the damaged grout and applying new grout, ensuring a proper bond and seal.
Keep Your Grout Looking Great
The key to long-lasting and aesthetically pleasing tile installations is proper grout selection, application, and maintenance:
- Regular inspections and timely maintenance can prevent small issues from escalating into bigger problems.
- Use gentle, regular cleaning techniques and avoid harsh chemicals to preserve the integrity of the grout.
- Seal your grout to protect it from moisture and stains, and address any signs of damage promptly to maintain the structural integrity of your tiled surfaces.
By adhering to these practices, you can ensure that your grout, and consequently your tile work, remains in excellent condition for many years.
Dirty grout ruining your tiles? Learn the best methods for cleaning grout in tiles quickly and effectively.


